
Firebase Hosting for static assets of a Sapper web app on Cloud Run
Sapper on Cloud Run with static assets hosted on Firebase Hosting Architecture
This is a follow-up post to Sapper, Google Cloud Run, Continuous Deployment - A boilerplate template.
In this second part, we are going to optimize how static assets are hosted and delivered to the browser. The final architecture for this post is going to be like this:
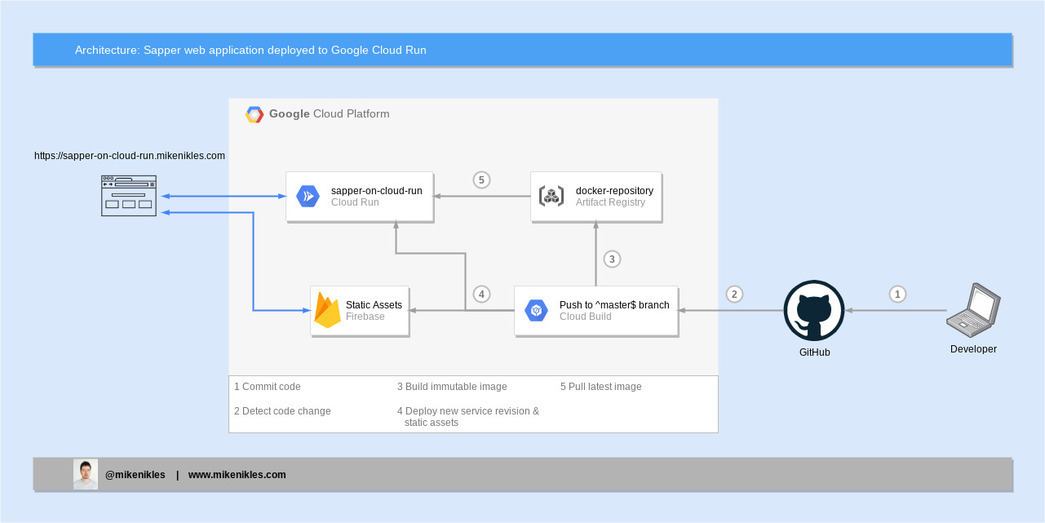
Sapper on Cloud Run with Firebase Hosting
What is the challenge here?
In the previous post, the Sapper application’s static directory is hosted within the Docker image. When a user visits the web application and requests the /favicon.ico file for example, that request goes to Cloud Run and the server responds with the icon.
The Cloud Run service we created in the previous post is hosted in the us-central1 region. When a user from South Korea visits the web application, her request travels all the way across the Pacific Ocean, half way through the United States until it reaches the Cloud Run service. The response then travels back the same way - that’s a lot of traveling… While a lot of that journey happens on Google Cloud’s global fiber network, it still adds latency. Check out this interactive explorer of what I’m talking about.
No problem, deploy the service in Korea
Not a bad idea, it certainly solves the latency for Koreans. It’s not a globally scalable solution though as we would have to continuously deploy to new regions as and when they become available.
A content delivery network (CDN) to the rescue
With a CDN, we can distribute the static assets to many locations around the world with minimal effort. The best part: We don’t have to deal with the complexity of all that as we will see in a minute.
Create a Firebase project
To stick to the cloud provider choice we made in the previous post, we are going to use Firebase and it’s Firebase Hosting solution.
As these instructions may change, please follow the first two steps of the documentation:
- Step 1: Create a Firebase project
Note: Use the existing GCP project from the previous blog post. Do not create a new GCP project! - Step 2: Register your app with Firebase
Note: Make sure you follow the (optional) instructions to set up Firebase Hosting for our web app.
Set up Firebase Hosting (Pull Request)
Anything discussed going forward assumes you read the previous blog post and have a repository set up accordingly.
To interact with the Firebase web application you created in the previous chapter, we use the Firebase command line interface (CLI).
To keep the Firebase scripts and configuration files out of the main Sapper web app directory, let’s create a firebase folder at the root of the project. We also need a package.json file where we can add NPM scripts to deal with Firebase:
mkdir firebase
cd $_ # The same as `cd firebase`, but less to type
Let’s also generate a package.json file within that directory. This allows us to write reusable NPM scripts and simplify the process later.
npm initFollow the prompts and provide meaningful values.
Still in the firebase directory, install the Firebase CLI with npm install -D firebase-tools.
Install firebase dependencies automatically
Separating the Firebase project files into their own directory keeps the code clean and maintainable. It does come with one drawback which we can easily mitigate. The challenge is that the firebase-tools dependency doesn’t get automatically installed when the Sapper app dependencies are installed.
Ideally, once the dependencies for the Sapper app are installed, we would like to also install the dependencies defined in the firebase/package.json file.
We can do this with a postinstall script in the root’s package.json file. This is automatically executed by NPM after the npm install command completes.
In root’s package.json, add the following script:
"scripts": {
  "postinstall": "npm install --prefix firebase",
}Note: You can use post* and pre* scripts for any defined NPM script, including your own custom scripts.
Log in to Firebase
Before we can initialize the Firebase project, we need to authenticate. To simplify that for other team members, let’s add the following NPM script to firebase/package.json:
"firebase:login": "firebase login",If you use a cloud-based development environment such as Gitpod.io, you can use the --no-localhost argument, as in firebase login --no-localhost. Then follow the instructions on the screen when you run the firebase:login script.
Let’s log in. Run npm run firebase:login in your terminal and follow the instructions. Once completed, you are now successfully logged in to Firebase and we can initialize the project.
Initialize Firebase CLI
To initialize the Firebase app, run the following command:
./node_modules/.bin/firebase initThere’s no need to create a NPM script similarly to how we did that for the login command. We only run the init command once.
The init command provides an interactive interface to configure the Firebase CLI. When you’re asked which Firebase CLI features you want to set up, select the following:
- Hosting: Configure and deploy Firebase Hosting sites
Press Enter to confirm your selection.
Select Use an existing project for the next question, then choose the project we created in the Firebase web console earlier and confirm with Enter. If you’re new to Firebase, you only see one option.
Keep all default values and say “N” when you’re asked whether to configure as a single-page app.
With that, the one-time initialization of the Firebase SDK is complete.
Deploy to Firebase Hosting
In its essence, deploying to Firebase Hosting is a single command: firebase deploy.
Open the package.json (the one in the firebase directory) and add the following script:
"scripts": {
  "deploy": "firebase deploy",
}
We can test this by running npm run deploy in the firebase directory.
When completed, the command displays a Hosting URL. Open this in your browser to see a placeholder page. This URL is where the web application will appear once we finish the automated deployment pipeline!
The content you currently see is defined in the public/index.html file. The deploy process publishes all files in the public directory. In our case, we want to copy the static files of the Sapper web application to that public directory. Given that, let’s delete the public directory as it will be generated automatically in the next chapter. We also want to tell git to ignore it by adding public to the firebase/.gitignore file.
To ensure the static content is copied every time we deploy to Firebase, we can leverage a feature of Firebase Hosting called predeploy scripts. Open firebase/firebase.json and add the following to the hosting section:
{
  "hosting": {
    ...
    "predeploy": "rm -fr ./public && cp -r ../static ./public"
  }
}
Lastly, we need to direct hosting requests to the containerized app that runs on Cloud Run. To achieve that, we again open firebase/firebase.json and extend the hosting section:
{
  "hosting": {
    ...
    "rewrites": [{
      "source": "**",
      "run": {
        "serviceId": "sapper-on-cloud-run",
        "region": "us-central1"
      }
    }]
  }
}
Conclusion
An extra 41 lines of code, including some NPM scripts for convenience, we managed to improve the end user experience for a Sapper application hosted on Cloud Run quite a bit. All static assets are now served through a CDN provided by Firebase Hosting. With that, these assets are distributed to edge locations around the world and served to end users with minimal latency.
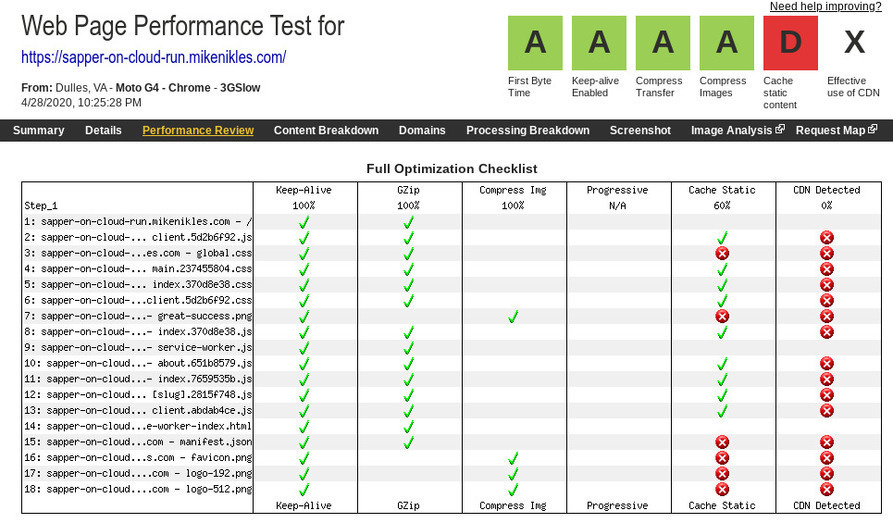
To compare, here are the WebPageTest results without Firebase Hosting (i.e. what we developed in the previous blog post):
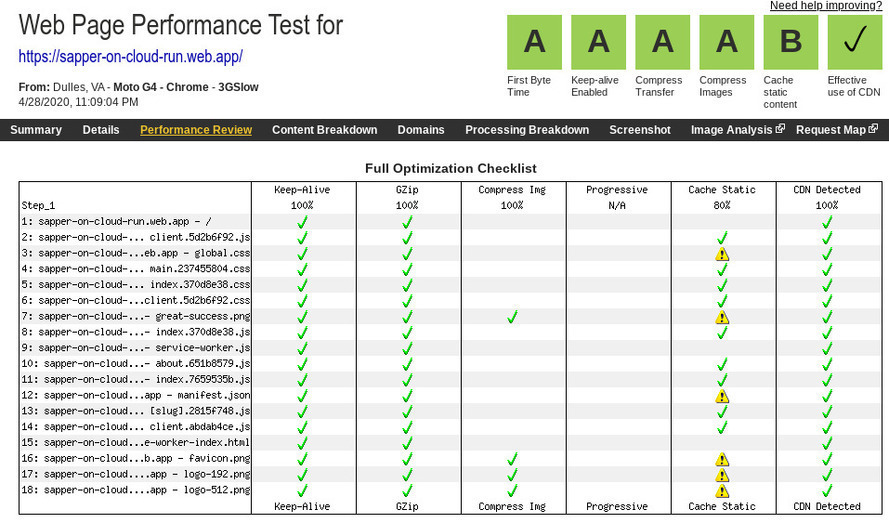
And here the WebPageTest results with Firebase Hosting (i.e. what we developed in this blog post):
👋